S3 파일 업로더 구성하기 (Cognito → S3)
Cognito를 활용해 client에서 file server를 거치지 않고 바로 S3로 저장하는 방법에 대해서 설명합니다.
S3 파일 업로더 구성하기 (Cognito → S3)
0. 시작하기 전에
본 글은 공식 가이드 문서를 참고하여 S3 파일 업로드 브라우저를 구성하는 과정을 기록합니다. 물론 공식 가이드 문서에 내용이 자세히 나와있으나, 잘 이해 안되거나 설명되지 않은 부분들 대해 이 글을 읽는 분들이 해소하실 수 있길 바라며 기록합니다.
먼저 해당 구성은 파일을 S3에 업로드 해야 하는 업무 요구사항이 있었습니다. 이를 위한 해결책으로 다음과 같은 방법들이 있었습니다.
- FTP 서버 구성 후 cronjob 으로 S3로 전달
- 로그인/권한 문제 해결될 수 있으나, 파일 전달 목적의 비효울성이 발생합니다.
- 파일 서버 구성 후 S3로 전달
- S3의 버킷 정책이나 ACL 등을 고려하지 않고 S3에 접근 가능한 IAM 역할을 가진 ec2로 쉽게 전달할 수 있으나, 파일 전달 목적의 비효율이 발생합니다. (서버를 한번 거쳐서 S3로 전달하기 때문)
- front page에서 client 차원으로 직접 S3로 파일 전달
- cognito, 권한 등을 고려해야 하는 문제가 있으나, client에서 직접 S3로 파일을 전달하므로 효율적입니다.
가장 빠르고 쉬운 방법으로 요구사항을 충족시킬 수 있는 구성을 택하려고 했고, 3번의 과정을 진행하면서 겪었던 내용을 기술합니다.
1. Building Block
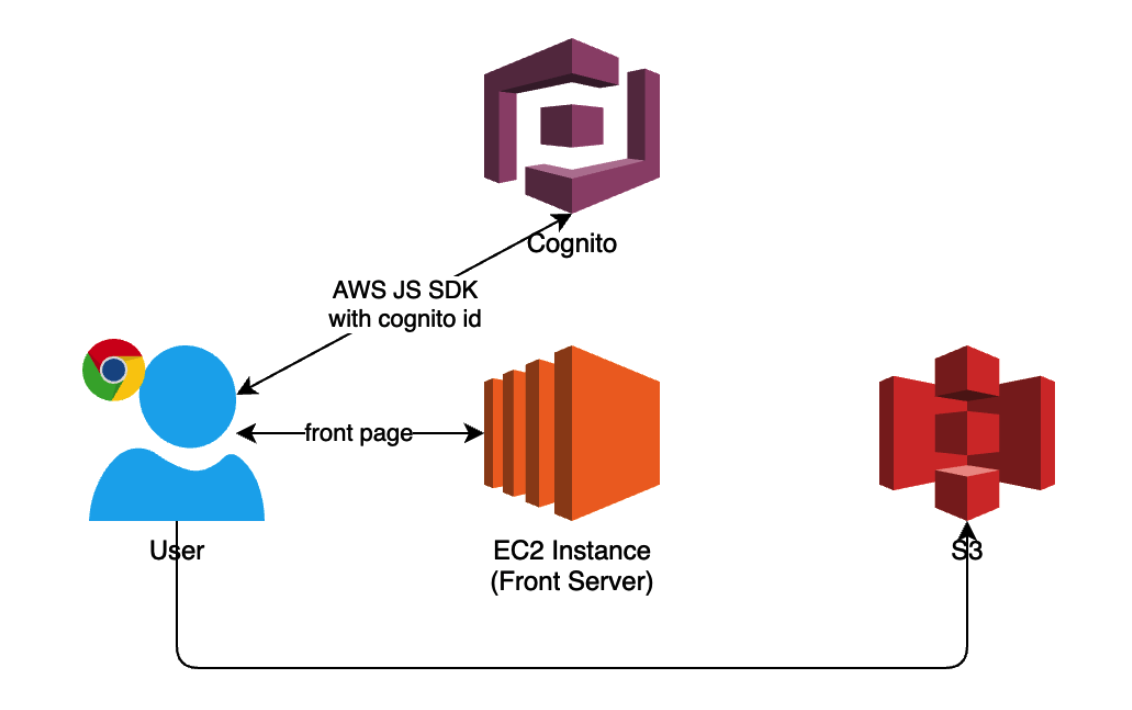
Building Block이 이해가 안가는 부분이 있을 수 있을 것 같아 약간의 설명을 덧붙입니다.
EC2는 사실 프론트 서버를 띄우기 위해 구성했는데 어떤 방식으로 띄워도 상관 없습니다. (S3 static render, lambda 등)
User는 응답받은 front페이지에서 Javascript sdk로 Cognito에 S3 버킷에 접근 가능한 권한의 키를 이 프론트 페이지가 들고있는지 확인받습니다. (여기서 Cognito를 활용하는데 로그인 방식과 비로그인 방식이 존재합니다)
S3는 Public한 공간에서 요청이 들어올텐데 이를 제한하기 위해 액세스 차단과 관련된 설정이 필요합니다. (다운로드를 불가능하게 한다는 등의 조건)
2. 구성
2.1. S3 버킷 생성
Amazon S3 → Buckets → Create bucket
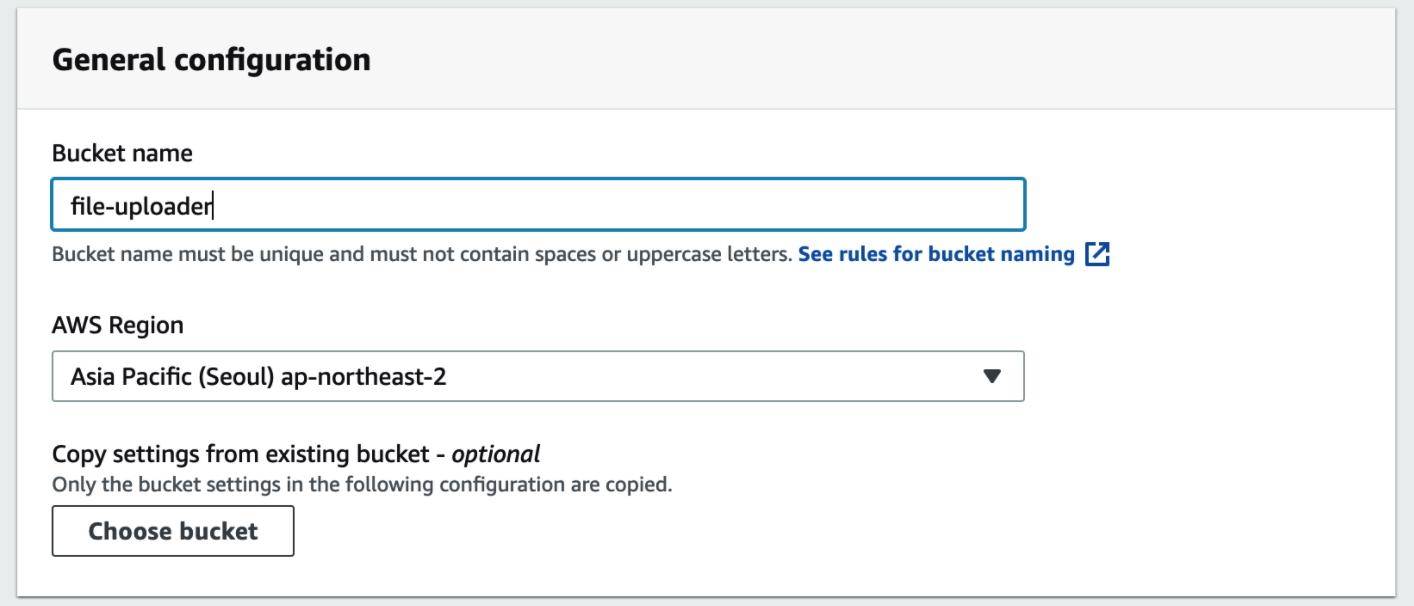
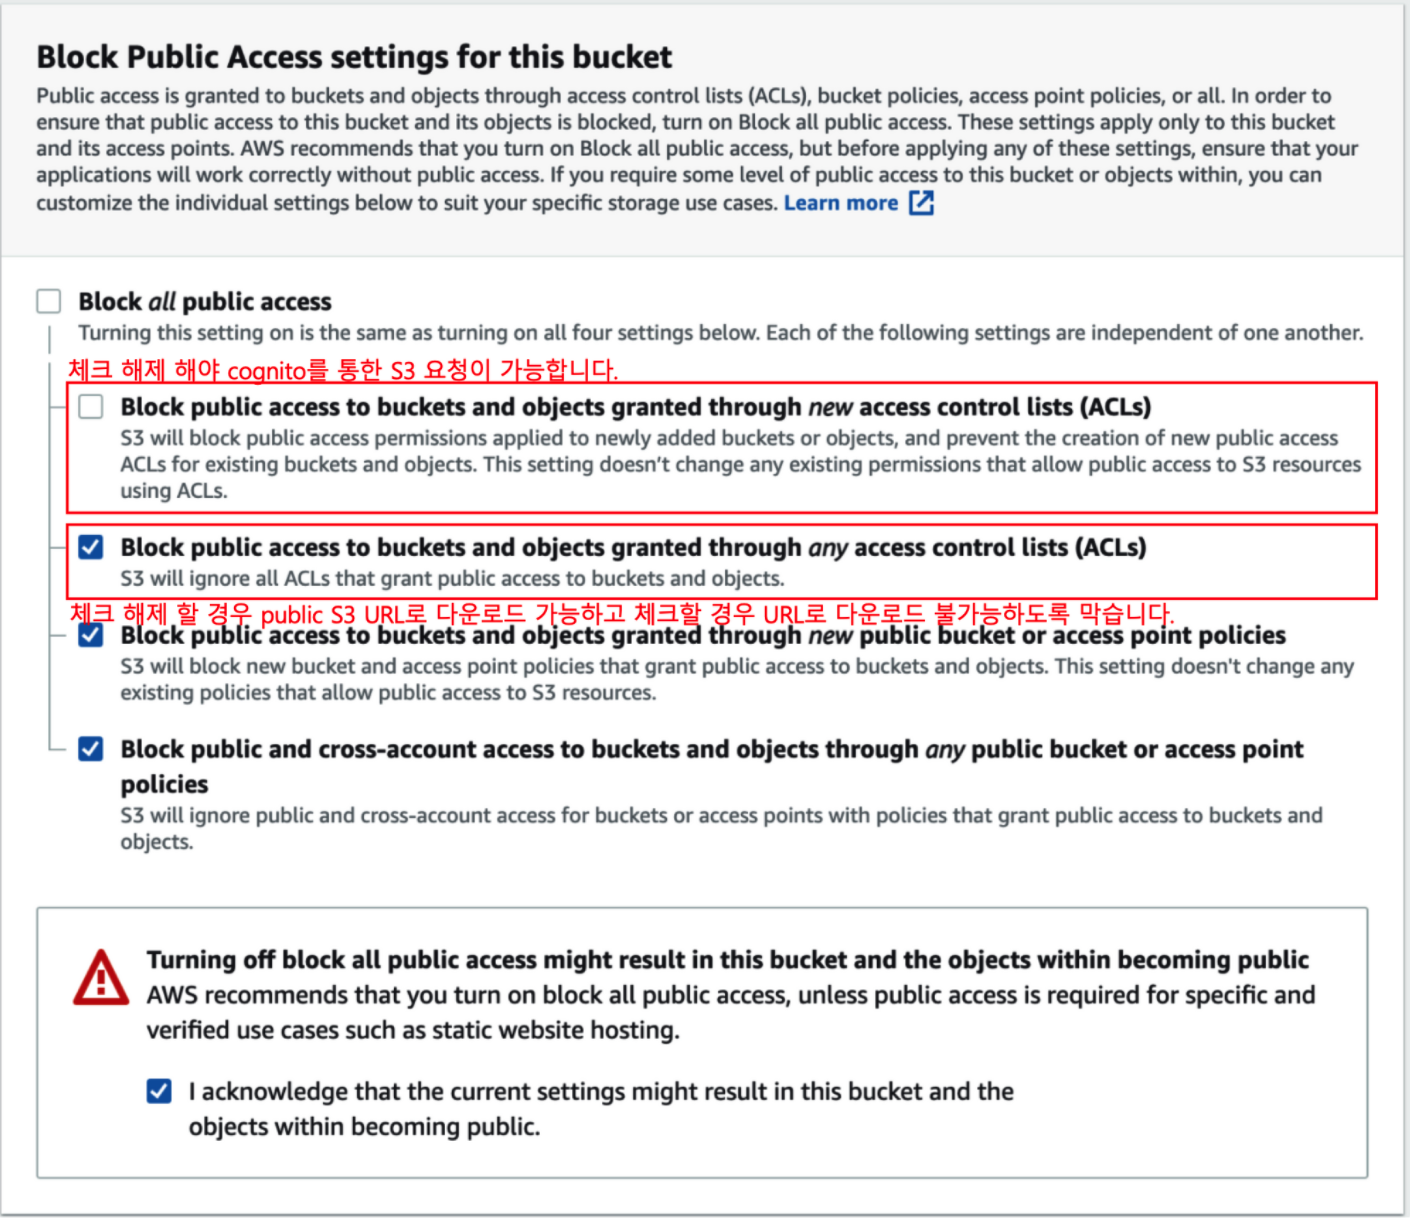
버킷 이름은 임의로 지정하고, 위와 같은 설정을 구성합니다.
여기서, 위 설정 내용을 조금 짚어봐야 할 것 같습니다. 필요한 내용은 붉은 글씨를 읽어주시기 바랍니다. 이 과정을 모두 거치고 나서 cognito를 이용한 파일 업로드는 성공했는데 외부에서 public url로 파일을 다운로드 못하도록 막고 싶었는데, ACL, bucket 정책 등에서 많이 헤매였던 경험이 있습니다.
2.2. S3 CORS 설정
Amazon S3 → Buckets → 생성한 Bucket → 권한 탭 → CORS 편집
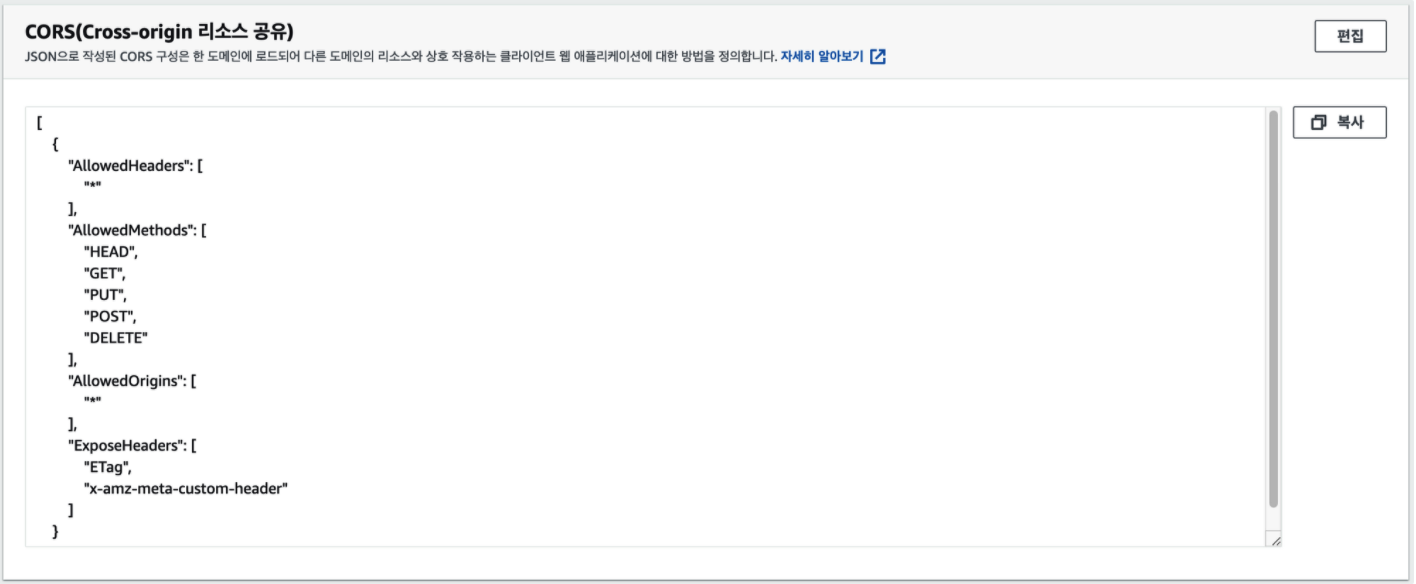
[
  {
    "AllowedHeaders": ["*"],
    "AllowedMethods": ["HEAD", "GET", "PUT", "POST", "DELETE"],
    "AllowedOrigins": ["*"],
    "ExposeHeaders": ["ETag", "x-amz-meta-custom-header"]
  }
]
위 내용이 들어갈 수 있도록 CORS 를 설정해줍니다. CORS 관련된 자세한 내용은 여기를 참고하시면 됩니다.
2.3. Cognitio 설정

Cognito 페이지에 가보면 위 화면처럼 사용자 풀 관리와 자격 증명 풀 관리를 생성할 수 있습니다. 본 글에서는 자격 증명 풀 관리만을 사용하지만, 사용자 풀 관리를 활용해 Cognito 인증 기반 요청을 수행할 수 있습니다. 이 글은 비인증 기반 요청을 다루기 때문에 자격 증명 풀 관리를 선택합니다.
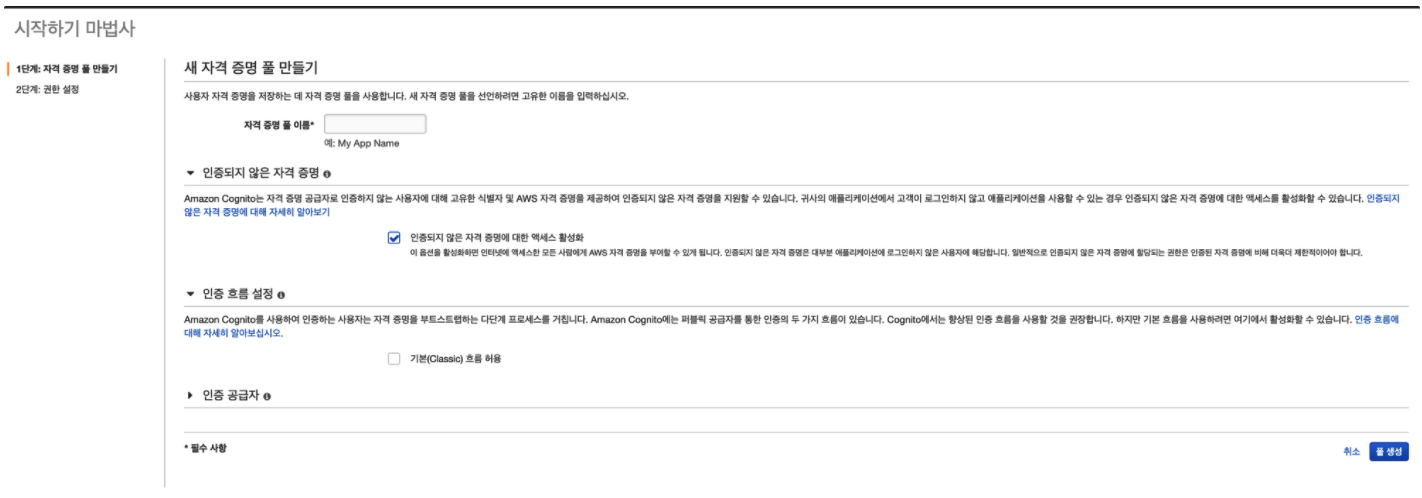
인증되지 않은 자격 증명에 대한 엑세스 활성화를 체크합니다.
이 내용은 Cognito를 통해 로그인 절차를 거친 뒤 얻은 key로 요청하는 방식과 로그인 하지 않고 자격증명 풀 관리 key만 가지고 요청하는 방식에 대해 어떻게 허용할 것인지에 대한 이야기 입니다. 저희는 별도로 로그인 과정을 거치지 않고 front 페이지에서 바로 요청할 것이기 때문에 비인증 자격 증명에 대한 엑세스 요청도 가능하도록 체크해줍니다.
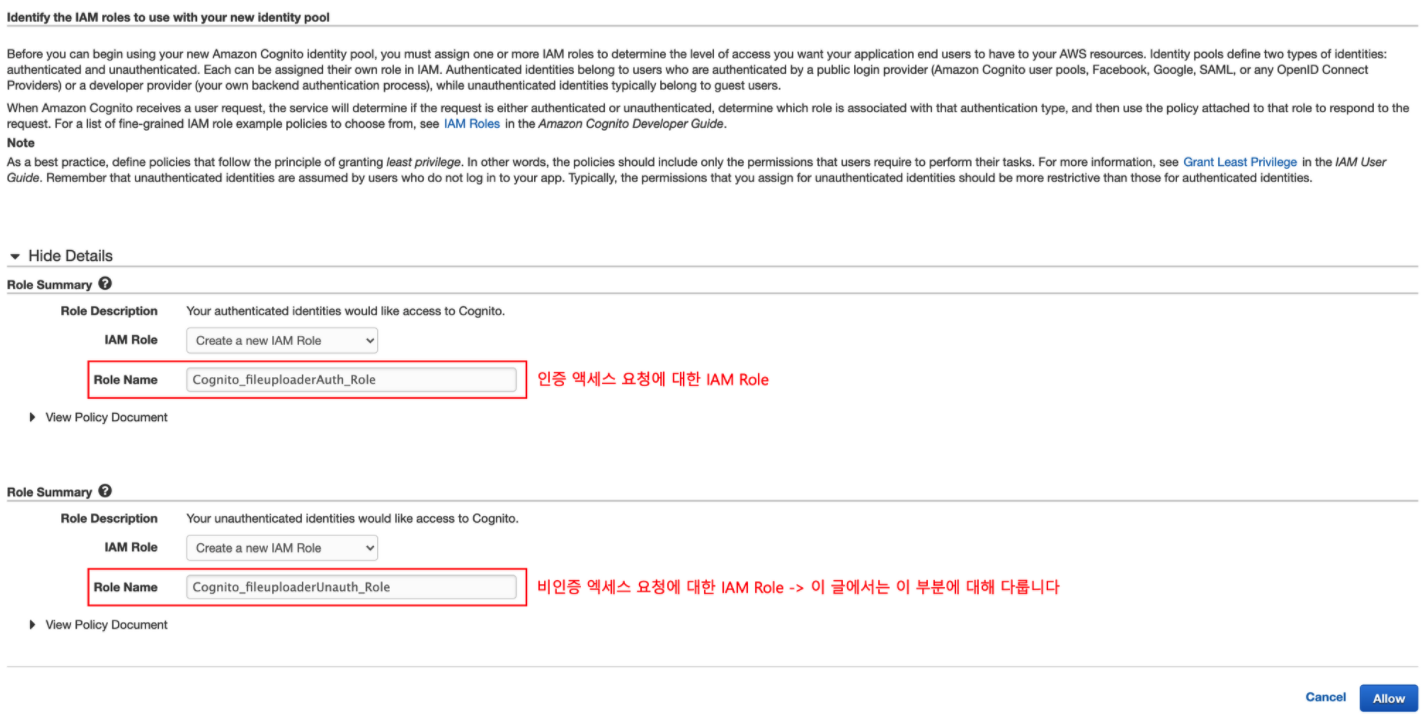

{
  "Version": "2012-10-17",
  "Statement": [
    {
      "Effect": "Allow",
      "Action": ["mobileanalytics:PutEvents", "cognito-sync:*"],
      "Resource": ["*"]
    },
    {
      "Effect": "Allow",
      "Action": [
        "s3:DeleteObject",
        "s3:GetObject",
        "s3:ListBucket",
        "s3:PutObject",
        "s3:PutObjectAcl"
      ],
      "Resource": ["arn:aws:s3:::BUCKETNAME", "arn:aws:s3:::BUCKETNAME/*"]
    }
  ]
}
이 화면에서 세부 정보 숨기기(Hide Details)가 감춰져 있는데, 여기서 무시하고 허용 버튼을 누르면 나중에 IAM 에서 해당 역할을 추가해야 합니다. 번거로운 작업을 줄이기 위해 해당 화면의 Unauth_Role 부분의 Policy 부분에 위 내용으로 바꿔준 뒤 허용 버튼을 누릅니다.
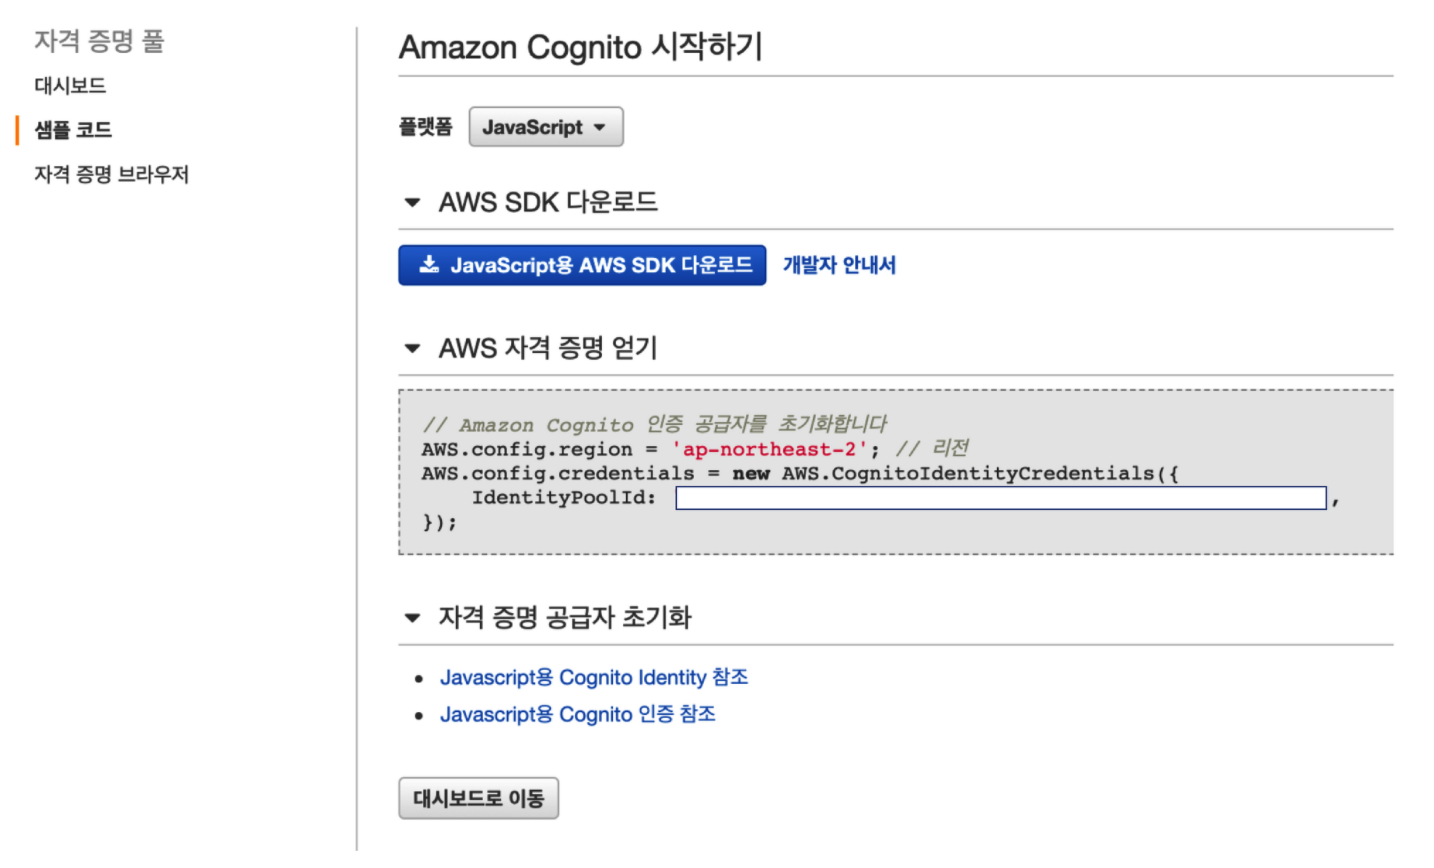
생성하고 나면 위 화면과 같이 샘플 코드에 IdentityPoolId가 보입니다. 이 Id는 나중에 front page의 javascript 에서 사용할 예정이므로 메모해둡니다.
2.4. Front Server 구성
front page는 공식 가이드 문서에서 제공하는 코드를 사용합니다. 사진을 업로드 하는 html, js 코드로 구성되어 있습니다.
저는 위 코드와 더불어 python flask 기반으로 간단하게 서버를 띄우도록 하겠습니다. 아래 코드 중 경로와 s3_photoExample.js 코드의 BUCKET_NAME, REGION, IDENTITY_POOL_ID 정보를 각각 채워줍니다.
index.html 코드의 SDK_VERSION_NUMBER 부분도 변경해줘야 하는데 아래 코드는 이미 반영해두었으니 확인만 해주시기 바랍니다.
./app.py
from flask import Flask, render_template

app = Flask(__name__)

@app.route("/")
def index():
    return render_template("index.html")

if __name__ == "__main__":
    app.run(host="0.0.0.0", port="5000", debug=True)
./templates/index.html
<!DOCTYPE html>
<html>
  <head>
    <!-- **DO THIS**: -->
    <!--   Replace SDK_VERSION_NUMBER with the current SDK version number -->
    <script src="https://sdk.amazonaws.com/js/aws-sdk-sdk-2.283.1.min.js"></script>
    <script src="static/js/s3_photoExample.js"></script>
    <script>
      function getHtml(template) {
        return template.join("\n");
      }
      listAlbums();
    </script>
  </head>
  <body>
    <h1>My Photo Albums App</h1>
    <div id="app"></div>
  </body>
</html>
./static/js/s3_photoExample.js
var albumBucketName = "BUCKET_NAME";
var bucketRegion = "REGION";
var IdentityPoolId = "IDENTITY_POOL_ID";

AWS.config.update({
  region: bucketRegion,
  credentials: new AWS.CognitoIdentityCredentials({
    IdentityPoolId: IdentityPoolId,
  }),
});

var s3 = new AWS.S3({
  apiVersion: "2006-03-01",
  params: { Bucket: albumBucketName },
});

function listAlbums() {
  s3.listObjects({ Delimiter: "/" }, function (err, data) {
    if (err) {
      return alert("There was an error listing your albums: " + err.message);
    } else {
      var albums = data.CommonPrefixes.map(function (commonPrefix) {
        var prefix = commonPrefix.Prefix;
        var albumName = decodeURIComponent(prefix.replace("/", ""));
        return getHtml([
          "<li>",
          "<span onclick=\"deleteAlbum('" + albumName + "')\">X</span>",
          "<span onclick=\"viewAlbum('" + albumName + "')\">",
          albumName,
          "</span>",
          "</li>",
        ]);
      });
      var message = albums.length
        ? getHtml([
            "<p>Click on an album name to view it.</p>",
            "<p>Click on the X to delete the album.</p>",
          ])
        : "<p>You do not have any albums. Please Create album.";
      var htmlTemplate = [
        "<h2>Albums</h2>",
        message,
        "<ul>",
        getHtml(albums),
        "</ul>",
        "<button onclick=\"createAlbum(prompt('Enter Album Name:'))\">",
        "Create New Album",
        "</button>",
      ];
      document.getElementById("app").innerHTML = getHtml(htmlTemplate);
    }
  });
}

function createAlbum(albumName) {
  albumName = albumName.trim();
  if (!albumName) {
    return alert("Album names must contain at least one non-space character.");
  }
  if (albumName.indexOf("/") !== -1) {
    return alert("Album names cannot contain slashes.");
  }
  var albumKey = encodeURIComponent(albumName);
  s3.headObject({ Key: albumKey }, function (err, data) {
    if (!err) {
      return alert("Album already exists.");
    }
    if (err.code !== "NotFound") {
      return alert("There was an error creating your album: " + err.message);
    }
    s3.putObject({ Key: albumKey }, function (err, data) {
      if (err) {
        return alert("There was an error creating your album: " + err.message);
      }
      alert("Successfully created album.");
      viewAlbum(albumName);
    });
  });
}

function viewAlbum(albumName) {
  var albumPhotosKey = encodeURIComponent(albumName) + "/";
  s3.listObjects({ Prefix: albumPhotosKey }, function (err, data) {
    if (err) {
      return alert("There was an error viewing your album: " + err.message);
    }
    // 'this' references the AWS.Response instance that represents the response
    var href = this.request.httpRequest.endpoint.href;
    var bucketUrl = href + albumBucketName + "/";

    var photos = data.Contents.map(function (photo) {
      var photoKey = photo.Key;
      var photoUrl = bucketUrl + encodeURIComponent(photoKey);
      return getHtml([
        "<span>",
        "<div>",
        '<img style="width:128px;height:128px;" src="' + photoUrl + '"/>',
        "</div>",
        "<div>",
        "<span onclick=\"deletePhoto('" +
          albumName +
          "','" +
          photoKey +
          "')\">",
        "X",
        "</span>",
        "<span>",
        photoKey.replace(albumPhotosKey, ""),
        "</span>",
        "</div>",
        "</span>",
      ]);
    });
    var message = photos.length
      ? "<p>Click on the X to delete the photo</p>"
      : "<p>You do not have any photos in this album. Please add photos.</p>";
    var htmlTemplate = [
      "<h2>",
      "Album: " + albumName,
      "</h2>",
      message,
      "<div>",
      getHtml(photos),
      "</div>",
      '<input id="photoupload" type="file" accept="image/*">',
      '<button id="addphoto" onclick="addPhoto(\'' + albumName + "')\">",
      "Add Photo",
      "</button>",
      '<button onclick="listAlbums()">',
      "Back To Albums",
      "</button>",
    ];
    document.getElementById("app").innerHTML = getHtml(htmlTemplate);
  });
}

function addPhoto(albumName) {
  var files = document.getElementById("photoupload").files;
  if (!files.length) {
    return alert("Please choose a file to upload first.");
  }
  var file = files[0];
  var fileName = file.name;
  var albumPhotosKey = encodeURIComponent(albumName) + "/";

  var photoKey = albumPhotosKey + fileName;

  // Use S3 ManagedUpload class as it supports multipart uploads
  var upload = new AWS.S3.ManagedUpload({
    params: {
      Bucket: albumBucketName,
      Key: photoKey,
      Body: file,
    },
  });

  var promise = upload.promise();

  promise.then(
    function (data) {
      alert("Successfully uploaded photo.");
      viewAlbum(albumName);
    },
    function (err) {
      return alert("There was an error uploading your photo: ", err.message);
    }
  );
}

function deletePhoto(albumName, photoKey) {
  s3.deleteObject({ Key: photoKey }, function (err, data) {
    if (err) {
      return alert("There was an error deleting your photo: ", err.message);
    }
    alert("Successfully deleted photo.");
    viewAlbum(albumName);
  });
}

function deleteAlbum(albumName) {
  var albumKey = encodeURIComponent(albumName) + "/";
  s3.listObjects({ Prefix: albumKey }, function (err, data) {
    if (err) {
      return alert("There was an error deleting your album: ", err.message);
    }
    var objects = data.Contents.map(function (object) {
      return { Key: object.Key };
    });
    s3.deleteObjects(
      {
        Delete: { Objects: objects, Quiet: true },
      },
      function (err, data) {
        if (err) {
          return alert("There was an error deleting your album: ", err.message);
        }
        alert("Successfully deleted album.");
        listAlbums();
      }
    );
  });
}
3. 결과 확인
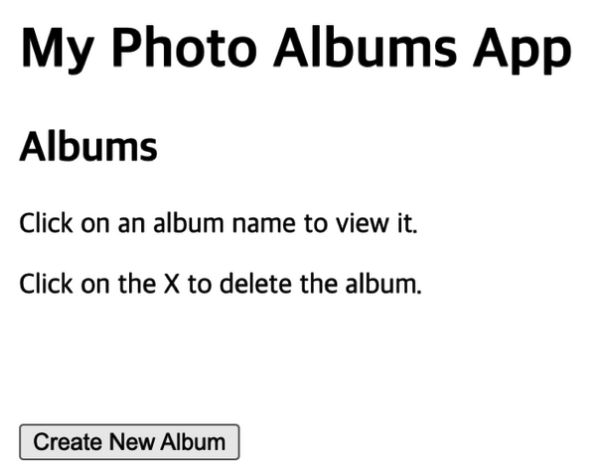
구성한 프론트페이지는 위 화면과 같이 뜨는 것을 확인해 볼 수 있습니다. 간단하게 폴더와 파일들을 조회하고 생성하고 삭제하고 업로드 하는 기능을 제공합니다.
그렇다면 업로드 된 파일을 public url로 다운로드 받아보는건 어떤지 확인해보도록 합니다.
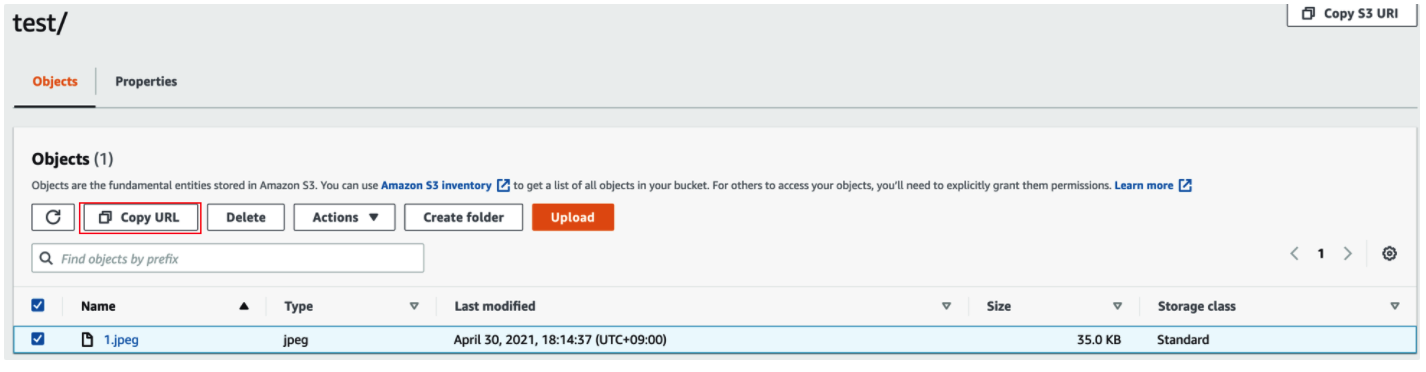
1.jpeg라는 파일을 test 폴더를 생성하고 업로드 하면 S3 화면에서 Copy URL로 public url을 얻을 수 있습니다.
이제 이 항목을 다운로드 받아보도록 합니다.

브라우저에서 접속한 경우
wget https://file-uploader.s3.ap-northeast-2.amazonaws.com/test/1.jpeg
--2021-04-30 18:16:37--  https://file-uploader.s3.ap-northeast-2.amazonaws.com/test/1.jpeg
Resolving file-uploader.s3.ap-northeast-2.amazonaws.com (file-uploader.s3.ap-northeast-2.amazonaws.com)... 52.219.56.99
Connecting to file-uploader.s3.ap-northeast-2.amazonaws.com (file-uploader.s3.ap-northeast-2.amazonaws.com)|52.219.56.99|:443... connected.
HTTP request sent, awaiting response... 403 Forbidden
2021-04-30 18:16:37 ERROR 403: Forbidden.
wget 명령으로 터미널에서 다운로드 시도한 경우
두 경우 모두 의도한 대로 동작하는 것을 알 수 있습니다.
이 권한 설정은 2.1 버킷 생성 과정에서 설명된 ACL 권한과 관련이 있으므로 혹시 의도하시는 권한 설정이 있다면 다시 한번 보시기 바랍니다.
4. 개선 사항
혹시 위 코드를 조금 수정해서 급한대로 파일 업로더로 사용하고 싶으시다면 아래와 같은 부분들을 어렵지 않게 수정할 수 있습니다.
-
image 파일 외 다른 파일형식 업로드 가능하도록 변경 (input의 type 변경)
-
여러 파일을 선택 가능하도록 변경 (input에 multiple 적용)
-
업로드중인 파일의 업로드 진행 상황 표시하도록 변경 (putObject 및 httpUploadProgress 사용)
s3.putObject(
  {
    Key: fileKey,
    Body: file,
    ACL: "public-read",
  },
  (err, data) => {
    uploadStatusDone = true;
    viewFolder(folderName);
    addFiles(folderName, files, number + 1);
  }
).on("httpUploadProgress", (event) => {
  document.getElementById("uploadinfo").innerHTML =
    fileName +
    " " +
    ((event.loaded / event.total) * 100).toFixed(2) +
    "% " +
    "(" +
    (number + 1) +
    "/" +
    files.length +
    ")";
});
5. 생각해볼 점
5.1. 보안 취약점 (비인증 액세스 방식 도입)
먼저 위 방법은 굉장히 취약한 방법입니다. 따라서 급하게 사용하는 경우에 최소한 보안 그룹 등을 이용한 화이트리스트 접근 제어나, 간단한 형식의 페이지 접근 password를 걸어두시길 바랍니다. 그 이유는 만약 해당 페이지에 접근 가능하다면 마우스 우클릭으로 쉽게 javascript의 소스코드를 확인할 수 있고 그 결과 cognito ID 확인할 수 있습니다.
5.2. 개선 방법 (인증 액세스 방식 도입)
글 초입부에 짧게 언급하였는데 이러한 방법을 사용자 풀 관리 와 함께 인증 액세스 방식을 도입하면 개선할 수 있을 것 같습니다. 본 글에서 다루지는 않지만 나중에 다루더라도 함께 찾아봤던 글들을 여기에 남깁니다.
https://www.slideshare.net/awskorea/intro-to-amazon-cognito-2016
https://mygumi.tistory.com/362
5.3. 다른 방법
간단하게 누군가가 쉬운 방법으로 S3에 파일을 업로드 하는 것이 목적이라면 아래와 같은 방법들이 있습니다.
1.awslabs 에서 만든 repo (조회만 가능한 버전)
https://github.com/awslabs/aws-js-s3-explorer
2.awslabs 에서 만든 repo의 alpha branch (업로드 다운로드 가능한 버전)
https://github.com/awslabs/aws-js-s3-explorer/tree/v2-alpha
3.electron 기반 s3 upload app
https://www.electronjs.org/apps/s3uploader
위 내용들은 리서치 과정에서 찾은 대안들 이며 실제로 시도해보지는 않았음을 밝힙니다.
6. 정리
개발을 하다보면 자연스레 저장소에 업로드해야하는 요청이나 필요한 경우가 자주 발생하곤 합니다. 파일 업로드 기능을 수행하기 위해 세부 요구사항에 맞게 그때 마다 조금씩 설계를 다르게 하곤 하는데 가장 흔하게 사용될 수 있는 cloud저장소의 업로드 방법 중 AWS S3 업로드와 관련된 내용을 한번 정리해보았습니다.
References
https://docs.aws.amazon.com/ko_kr/sdk-for-javascript/v2/developer-guide/s3-browser-examples.html
댓글남기기